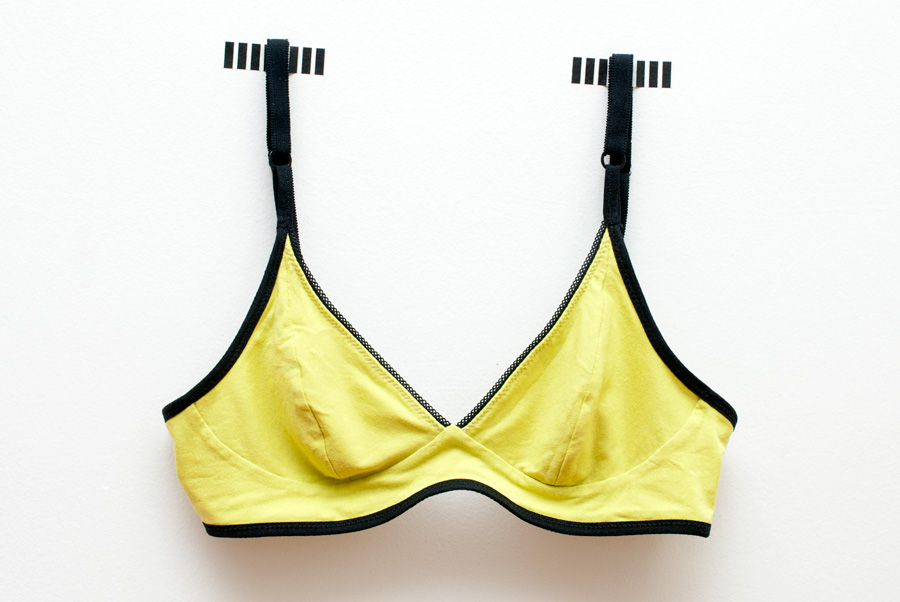
Wearable Toile: Neon Green Cloth Habit Watson Bra
Welcome, creepy Internet people! Why don’t you take a look at my underwear?
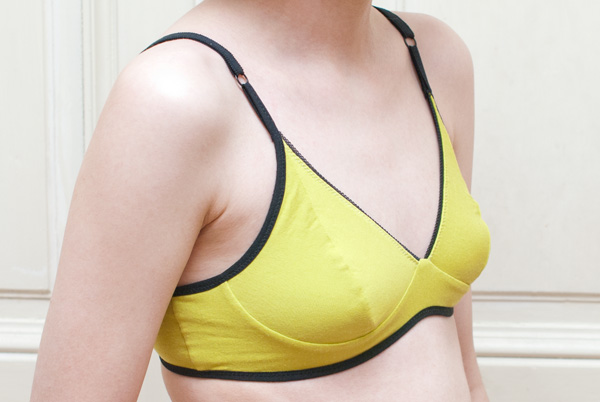
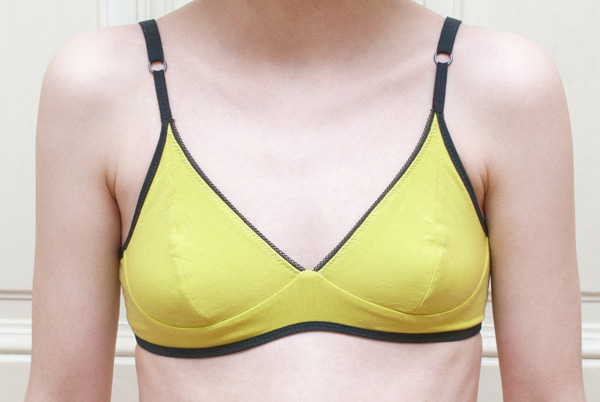
Seriously, I have thought about this and have decided that I don’t mind posting photos of my new bra on the Internet—as long as they are reasonably anonymous. Now, I know that since I’m telling you guys that it’s me, they are obviously not anonymous, but here’s what I’ve done to make the modelled shots look less like me than posting Your Average Sexy Lingerie Shots: a) I have cropped them a lot, and most importantly, I have cropped off my head; b) I have retouched them heavily to remove any birth marks and such; and c) I have made them smaller than I usually make my blog photos. The resulting photos look slightly odd (my boyfriend says the pale, spotless skin makes me look like some weird mannequin), but they still show the fit of the bra on a real less-than-A-cup lady, and that’s why I’m posting them in the first place: I figured it might help other people whose bust size is close to mine. I know that there are some of you out there, even though most of the modelled bra photos one can find online are of perfectly lovely full-busted ladies. Small-busted ladies need underwear too!
So, here goes, I’ve made a bra toile. It doesn’t fit quite right yet, but it’s definitely wearable. In fact, it’s almost as good as any ready-to-wear options I have, so I’m really hopeful that I’ll get a great fit if I adjust the pattern a bit!
Pattern
This is the Cloth Habit Watson Bra and Bikini pattern, which I got for Christmas from my brother. I made View B of the bra, in a size 32A. I am actually a size 32AA according to Amy’s measuring instructions, but since that size isn’t included in the pattern, I went with the closest size for my wearable toile. Amy recommended I do that and just take in the cup seams if I need to.
Supplies
The fabric is a lightweight viscose jersey with a little elastane, I think. I bought it from Müller, where it wasn’t labelled, but it feels and behaves like a viscose jersey with elastane that I’ve used before. The piece was left over from a pattern testing version of the GrayDay Sandpoint Top—that I never blogged about because I didn’t like it enough but also didn’t hate it enough. I used the wrong side of the fabric on the outside because I liked the texture of the purl stitches.
I bought the elastics at Verstrickt & Zugenäht. The strap elastic is 12mm wide and I initially used the same 1cm wide plush-back elastic for the top and bottom edges because they didn’t have any other option at Verstrickt & Zugenäht. I used 1m of the strap elastic and less than 1.5m of the plush-back elastic. When I tried on the finished bra, it was somewhat uncomfortable under the arms and at the bottom of the band, so I unpicked the elastic there and replaced it with fold-over elastic from my stash. I’m pretty sure that this has compromised the fit, but I’d rather have a slightly less pretty bra than an uncomfortable one.
The rings and sliders are from an old bra that I cut apart a while ago.
Adjustments
-
I lined the cups à la Carolyn. I mostly just followed Carolyn’s construction notes and cross-referenced the instructions that came with the pattern when I felt like I needed more guidance.
-
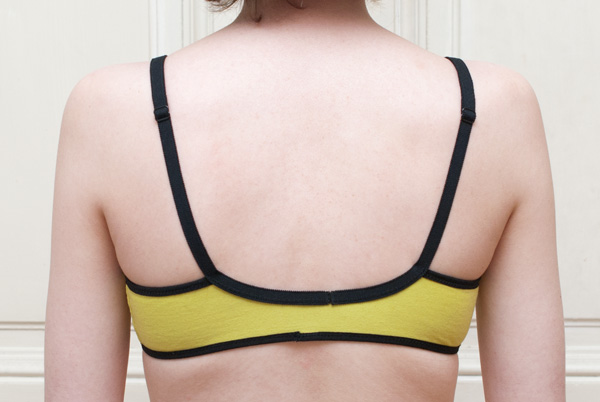
I cut the back band on the fold rather than adding a closure. I didn’t feel like sewing in the closure and I don’t mind pulling my bras on over my head. I added 2cm to the centre back on each side, if I remember correctly, to account for the width of the closure. I also doubled up the fabric in order to make the band a little sturdier.
What I struggled with
-
Sewing flimsy, slippery little pieces of viscose jersey together with an even 6mm seam allowance is … not easy. I think that it doesn’t matter all that much, since the whole bra is stretchy anyway, but my seam allowances are definitely not accurate.
-
I still need a lot of practice when it comes to attaching elastic. The elastic doesn’t meet neatly at centre back, my zigzag stitches are all over the place, and the plush-back elastic wasn’t lying quite flat and was cutting into my skin before I replaced it with the fold-over elastic. I think that that was probably my fault and the elastic would be fine if I’d attached it properly, but I will also keep looking for a softer underwear elastic.
-
Attaching the rings to the tops of the cups was hard and looked rather messy because the decorative edge of my elastic was too wide. When I attached the fold-over elastic, I made loops at the top that I slipped through the rings and then sewed to the back of the cups. I think that the loops are too long and look odd, but they look better than my attempt at the original method.
What I want to do differently next time
-
The A cups fit surprisingly well, considering my measurements called for AA cups, but there seems to be a little bit of excess fabric at the top of the cups and the seams are rippling a bit, so I’ll flatten the cup curve for my next try.
-
The cradle is wrinkling under the arms and also very slightly under the cups. I have sent Amy of Cloth Habit some photos and she thinks the wrinkles are mostly caused by the viscose jersey I used, but I might also want to shorten the band a bit and use a wider band elastic. I’ll try a firmer cotton/elastane jersey next time, I think, and I’ll probably also try to properly attach the suggested elastics instead of my fold-over elastic cop-out.
-
The bridge isn’t lying completely flat. I’m not sure whether this can even be fixed in a soft bra like this.
-
I should have read the instructions through completely before cutting my strap elastic into two pieces. Without the back closure, it would have been neater to attach it in one piece. This time, I just zigzagged the two straps together again before attaching them to the bra.
-
I should pay a lot more attention to trimming/grading my seam allowances. I always struggle with this.
Photos of me taken by my boyfriend.