Wearable Toile: Boring Grey Papercut Pleated Shorts
Okay, I’m not happy with the quick photos we’ve taken of these shorts, but I’m pretty much over the shorts as well, so I figured I’d post this with bad photos instead of not posting it at all.
Pattern
The Papercut Patterns Pleated Pants/Shorts, in size XS. Most reviews say that these run very large and to make the smaller size if you are between sizes, or even to size down by a size or two. I’m rather confused by that. I believed those people at first and, considering my measurements are between sizes XXS and XS, I made my first toile up in a size XXS. I wouldn’t have been able to zip those shorts up! So I made another toile in size XS and that one fit me well enough out of the envelope that I decided to make a hopefully-wearable toile out of some “real” fabric.

Fabric
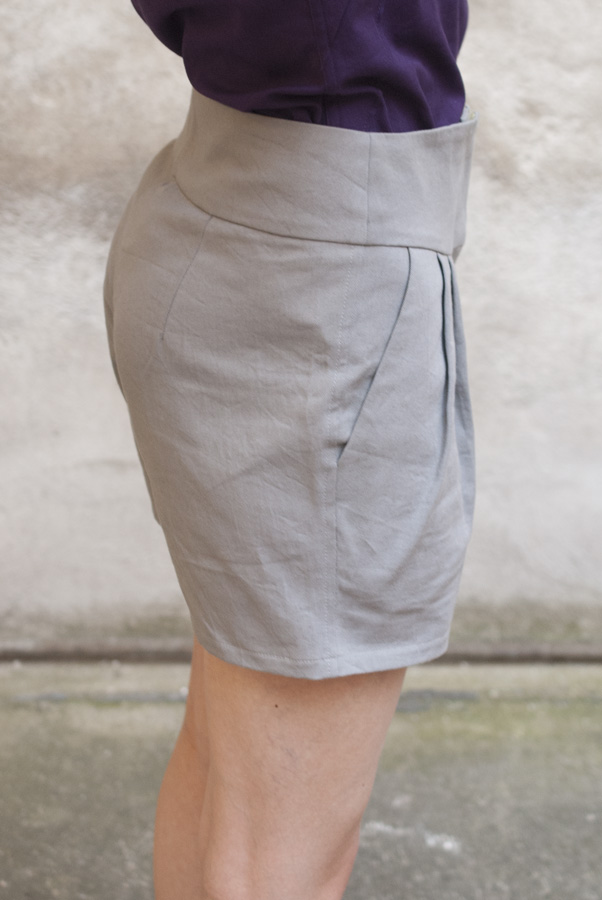
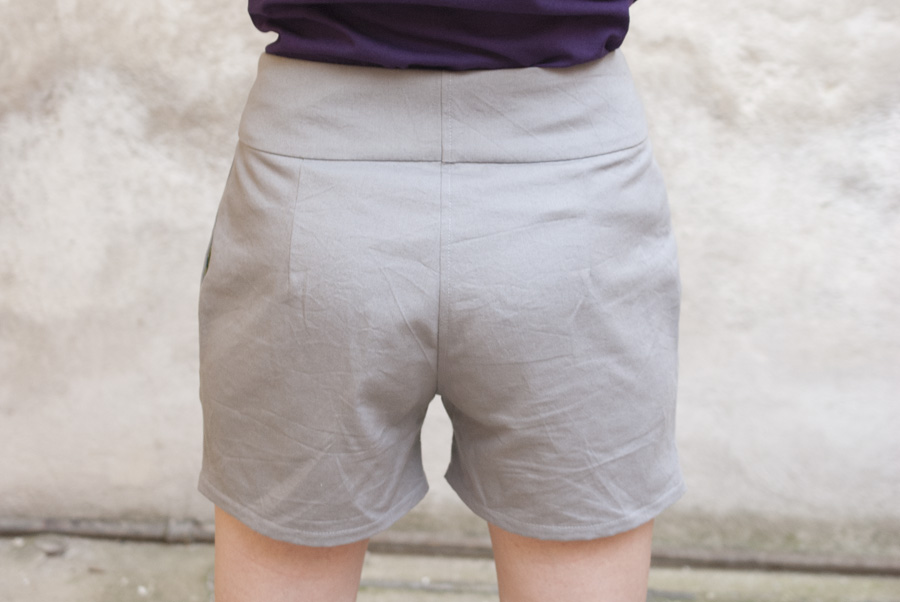
For the main fabric, I used about half a metre of the grey cotton gabardine that was left over from my Cooper backpack. I had bought as much as the pattern said I needed and then ended up using less than half of it. I was annoyed about that at the time because I didn’t think I could make anything useful out of the remaining fabric, but these shorts have proven me wrong. In hindsight, this was a pretty bad fabric choice. The gabardine is too lightweight and wrinkles like crazy, which really highlights that the shorts aren’t fitting quite right.
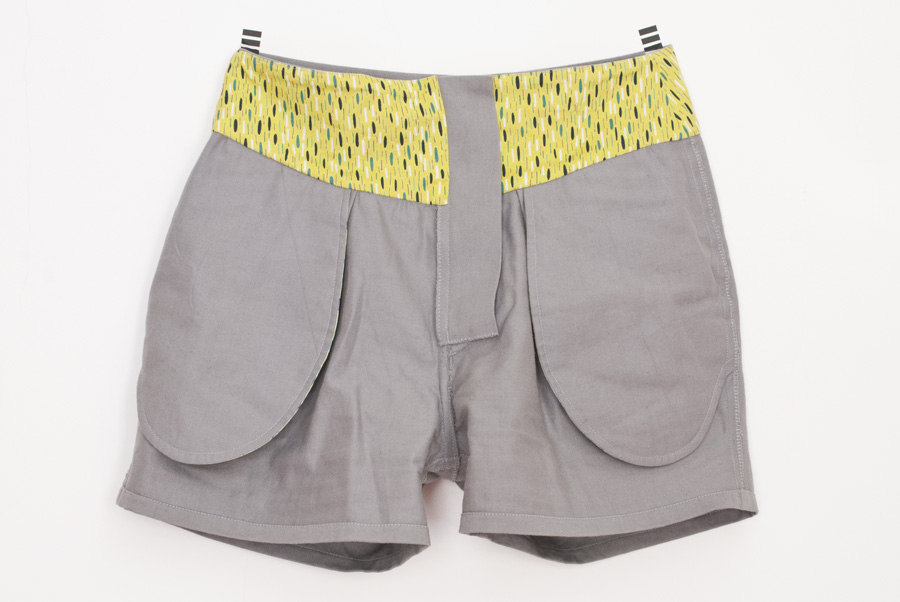
For the waistband lining and the front of the pocket bags, I used some scraps of bright green quilting cotton that I had lying around.
Adjustments
-
I redrew several of the pattern pieces. When I made my first toile, I thought that I had been inaccurate when tracing the pattern because the pattern pieces didn’t fit together perfectly. After tracing another size and having the same issue, I have concluded that it’s very unlikely that it was me. Whatever it was, I was unhappy with this, so I adjusted the pieces to make them all fit together correctly. I thought that I might want to make several pairs of these shorts (and also the pants variation) and I really didn’t want to fiddle with non-matching pattern pieces every time.
-
I lengthened the legs of the shorts variation by about 4cm. The original length is very short (and I’m not particularly tall or long-legged).
-
I French-seamed the pocket bags. This was a bit of a fiddly job with the 1cm seam allowance and I’m pretty sure my pockets are now slightly smaller than intended—but that’s a price I’m happy to pay for French-seamed pocket bags.
- I slip-stitched the inside of the waistband by hand. I suck at stitching in the ditch and prefer to avoid it whenever possible.
What I struggled with
-
Step 8 of the instructions talks about the “left trouser side”. The diagram next to it shows the right trouser leg. I had to cross-reference the Thurlow instructions to figure out which side I was supposed to work with for the next few steps. For future reference: They mean the left side; the written instructions are correct, but all of the diagrams from Step 8 onwards are mirrored.
-
The waistband, as always. I have no idea what it is, but I’m always having issues with waistbands. I tend to mix up what goes where and I often have problems with the bulk. I usually follow Lisa’s excellent tutorial, but since the construction order of this pattern is highly idiosyncratic, I decided to try and follow the instructions to the letter and see how things go—at least for this first attempt.
What I want to do differently next time
I’m not sure I’ll make another version of these, since I can probably find a pattern that looks more flattering on me right out of the envelope. I still like the idea of the pleats, however, so if I wanted to try and make these work, the following are the main things I should pay attention to.
-
I should probably remove the seam allowances from the pattern pieces, or change them to 1.5cm. I prefer patterns without seam allowances because they’re just a lot easier to adjust, and they let me choose my own seam allowances. I would really, really have preferred 1.5cm for these because I like flat-felled seams on trousers/shorts—but I wasn’t brave enough to attempt those with 1cm seam allowances.
-
The fit isn’t perfect. It’s reasonably good, considering I haven’t made any fit adjustments at all. I’m particularly impressed with the fit in the back. No swayback issue! These already fit better than most ready-to-wear trousers I’ve ever owned, at least in the back. Still, the fit isn’t quite as good as I’d like. The curve at the hips isn’t right for me, there’s a little extra fabric there. I could use a little more room for my “protruding derrière”, which currently pulls the side seams to the back a bit. And the front waistband is a little loose and the front crotch slightly baggy, which looks even worse in a wrinkly fabric. So if I make another version, I’ll have to tweak the pattern somewhat.
-
I would definitely use a sturdier fabric. A medium- to heavyweight denim would be lovely.
-
I would probably assemble the next pair in a more traditional construction order. I’m not quite sure what the benefit of this pattern’s very odd method is supposed to be. It worked fine overall, but I haven’t really discovered any particular reason why this method is superior, so I would probably go back to what I’m used to.
Photos of me taken by my boyfriend.